How To Make Brown Frosting With Food Coloring: A Complete Guide
Brown frosting adds a rich, sophisticated touch to cakes, cupcakes, and cookies. Whether you’re aiming for a deep chocolate hue, a warm cocoa shade, or a subtle caramel tone, the secret lies in mastering color mixing with food‑grade dyes. This article walks you through the science, the ratios, and the step‑by‑step process to create perfect brown frosting every time.
Why Use Food Coloring for Brown Frosting?
Food coloring gives you precise control over shade and intensity. While cocoa powder or melted chocolate can also produce brown tones, they may alter the flavor or texture of the frosting. By using food‑safe liquid or gel dyes, you keep the original taste of your buttercream or cream cheese base untouched and achieve a consistent color across large batches.
Understanding Color Theory: Complementary Mixing
Did you know that mixing a pair of complementary colors—such as red and green, or blue and orange—creates a neutral brown? This principle is handy when you only have primary colors on hand. However, for the most reliable results, most bakers prefer a combination of red, yellow, and blue food coloring, adjusting each hue until the desired brown is reached.
Ingredients and Tools
- Base frosting (buttercream, cream cheese, or whipped cream)
- Food‑grade liquid or gel coloring (red, yellow, blue, and optionally black)
- Small mixing bowls or a palette
- Measuring spoons or a dropper
- Whisk or electric mixer
- Spatula
Step‑by‑Step: Making Brown Frosting With Food Coloring
- Prepare the frosting base. Beat your chosen frosting until it’s light and fluffy. For a classic buttercream, use 1 cup (226 g) softened butter and 3–4 cups (360–480 g) powdered sugar, adding a splash of milk or cream for consistency.
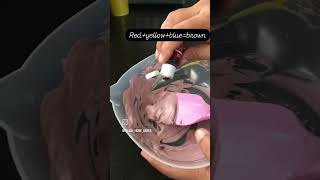
- Start with a small amount of color. Place a few drops of red food coloring in a separate bowl. Red is the strongest of the primary colors, so begin with 2–3 drops.
- Add yellow. Mix in an equal number of drops of yellow. The combination of red and yellow creates orange, the first step toward brown.
- Introduce blue gradually. Add 1–2 drops of blue. Blue will darken the orange, moving the hue toward brown. Stir well after each addition.
- Fine‑tune with black (optional). If the shade is too bright, a single drop of black or a darker brown dye can deepen the color without affecting flavor.
- Blend into the frosting. Transfer the mixed color to the main bowl of frosting. Fold gently with a spatula, then beat on low speed to ensure even distribution.
- Adjust as needed. If the frosting is lighter than desired, repeat the color‑mixing steps in a separate cup and incorporate more drops gradually. Remember, a little color goes a long way.
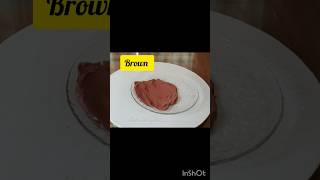
- Test the shade. Spread a small amount on a piece of parchment paper. The color may appear slightly lighter when wet; let it set for a minute to see the true hue.
- Use immediately or store. Brown frosting can be piped, spread, or used for decorative swirls. Store any leftovers in an airtight container in the refrigerator for up to 5 days.
Tips for Consistent Brown Color
- Use gel colors. Gel dyes are more concentrated than liquid, requiring fewer drops and reducing the risk of thinning the frosting.
- Keep a color chart. Write down the exact number of drops used for each batch. This makes reproducing the same shade easier for future projects.
- Consider the base color. A vanilla‑colored frosting will yield a lighter brown, while a cocoa‑infused buttercream starts darker, requiring fewer dye drops.
- Mix thoroughly. Uneven color distribution can cause streaks. Scrape the sides of the bowl and beat the frosting for at least 30 seconds after each color addition.
- Temperature matters. Frosting that’s too warm may become runny, making it harder to achieve a uniform color. Chill the frosting briefly if it becomes too soft.
Alternative Methods: Using Complementary Colors
If you only have primary colors, you can still achieve brown by following a complementary‑mix approach:
- Mix red and green (green can be made by combining blue and yellow).
- Adjust the ratio until the mixture turns a muted brown.
- Blend the resulting brown into your frosting as described above.
This technique is especially useful for home bakers who keep a limited palette of food dyes.
Common Mistakes and How to Avoid Them
- Over‑coloring. Adding too many drops can turn the frosting gray or black. Add color slowly and test frequently.
- Thinning the frosting. Liquid dyes add moisture. If the consistency changes, add a little extra powdered sugar to restore thickness.
- Ignoring the base flavor. Using a chocolate‑flavored frosting already contains brown pigments; you may need only a tiny amount of additional color.
- Skipping the rest period. Letting the colored frosting sit for a few minutes lets the pigments settle, giving you a true representation of the final shade.
Creative Uses for Brown Frosting
Once you’ve mastered the perfect brown hue, the possibilities are endless:
- Decorate chocolate‑themed cakes with a contrasting brown buttercream for a modern look.
- Create cocoa‑brown swirls on cupcakes using a piping bag and a star tip.
- Use brown frosting as a base for marble effects by adding white or caramel ribbons.
- Combine with edible gold leaf for an elegant, rustic finish on wedding desserts.
Conclusion
Making brown frosting with food coloring is a simple yet rewarding skill that elevates any baked creation. By understanding the ratio of primary colors, using concentrated gel dyes, and following a careful mixing process, you can achieve a consistent, vibrant brown every time. Whether you’re decorating a birthday cake, preparing cupcakes for a corporate event, or experimenting with artistic frosting designs, this guide provides the foundation you need to create beautiful, bakery‑quality brown frosting at home.