How To Make Brown Gravy: A Step‑by‑Step Guide
There is not much better than a delicious homemade gravy to top your favorite dish. Whether you’re dressing up a roast, mashed potatoes, or a simple bowl of rice, a rich brown gravy adds depth and comfort to any meal. In this article we’ll walk you through everything you need to know to create a classic brown gravy from scratch, share a few pro tips, and suggest variations that keep the flavor exciting.
Why Choose Homemade Brown Gravy?
Store‑bought gravies often contain excess sodium, artificial thickeners, and preservatives. By making your own, you control the ingredients, adjust the seasoning to your taste, and achieve a velvety texture that commercial versions can’t match. Don’t let the idea of making gravy intimidate you—the process is straightforward, and the results are rewarding.
Essential Ingredients
- Pan drippings – the flavorful bits left after roasting meat (beef, chicken, or turkey).
- 2 tablespoons all‑purpose flour – for thickening.
- 2 cups stock (beef, chicken, or vegetable) – choose low‑sodium for better control.
- 1 tablespoon butter – adds richness.
- Salt and freshly ground black pepper – to taste.
- Optional: a splash of red wine, a pinch of dried herbs, or a dash of Worcestershire sauce for extra depth.
Equipment You’ll Need
- Heavy‑bottomed skillet or roasting pan.
- Whisk.
- Measuring spoons and cups.
- Sieve (optional, for a perfectly smooth finish).
Step‑by‑Step Process
1. Collect the Pan Drippings
After roasting your meat, remove it from the pan and set it aside to rest. Pour the drippings into a heat‑proof bowl, skim off excess fat, and reserve about 2 tablespoons. If you don’t have enough drippings, melt 2 tablespoons of butter as a substitute.
2. Create a Roux
Return the reserved fat (or butter) to the hot pan over medium heat. Sprinkle the flour evenly and whisk continuously. Cook the mixture for 2–4 minutes, stirring constantly, until it turns a deep golden‑brown color. This toasting step develops the characteristic nutty flavor of brown gravy.
3. Deglaze the Pan
Slowly add the stock while whisking to prevent lumps. If you’re feeling adventurous, add a splash of red wine at this stage – it brightens the flavor and adds a subtle acidity. Continue whisking until the mixture is smooth.
4. Simmer and Thicken
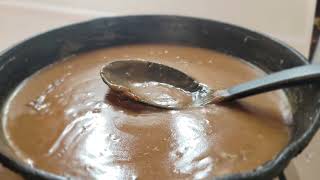
Bring the gravy to a gentle boil, then reduce the heat to low. Let it simmer for 5–10 minutes, stirring occasionally, until it reaches your desired thickness. If the gravy becomes too thick, thin it with a little more stock or water.
5. Season and Finish
Season with salt, pepper, and any optional herbs or Worcestershire sauce. Taste and adjust the seasoning. For an ultra‑silky texture, strain the gravy through a fine‑mesh sieve before serving.
Pro Tips for Perfect Brown Gravy
- Use a dark roux – the longer you toast the flour, the richer the color and flavor.
- Control the heat – medium heat prevents burning while allowing the roux to develop evenly.
- Gradual liquid addition – pouring stock slowly while whisking avoids lumps.
- Rest before serving – letting the gravy sit for a few minutes lets the flavors meld.
Variations to Try
Herb‑Infused Gravy
Add a teaspoon of dried thyme or rosemary during the simmering stage. Freshly chopped parsley at the end adds a pop of color.
Mushroom Brown Gravy
Sauté sliced mushrooms in the pan before making the roux. The earthy mushroom flavor pairs beautifully with beef or poultry.
Spicy Kick
Stir in a pinch of cayenne pepper or a dash of hot sauce for a subtle heat that awakens the palate.
Serving Suggestions
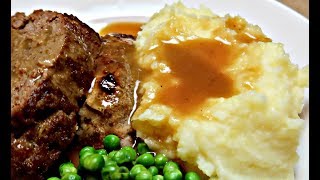
This homemade brown gravy is versatile. Drizzle it over:
- Roast beef or prime rib.
- Mashed potatoes.
- Yorkshire puddings.
- Steamed vegetables such as carrots and green beans.
- Rice bowls or grain‑based salads for extra richness.
Frequently Asked Questions
Can I make brown gravy ahead of time?
Yes. Prepare the gravy up to the seasoning step, let it cool, then store it in an airtight container in the refrigerator for up to three days. Reheat gently on the stove, adding a splash of stock if it thickens too much.
What if I don’t have pan drippings?
Use a combination of butter and a teaspoon of soy sauce to mimic the savory depth of drippings. The soy sauce adds umami without overwhelming the flavor.
How do I fix a watery gravy?
Make a slurry by mixing 1 tablespoon of flour with 2 tablespoons of cold water. Whisk the slurry into the simmering gravy and cook for a few more minutes until thickened.
Where to Find More Inspiration
Part 2 of this video is now LIVE!! Check it out for a visual walkthrough of the entire process. If you’re curious about regional twists, search for “रेस्टोरेंट की 3 सीक्रेट ग्रेवी से बनाएं 50 से ज्यादा डिशेज -Yellow” to discover secret techniques used in Indian kitchens.
Conclusion
Mastering brown gravy is a fundamental skill that elevates everyday meals into comforting, restaurant‑quality dishes. By following the steps above, you’ll create a luscious, glossy sauce that complements any protein or side. How about a homemade gravy tonight? With a few simple ingredients and a little patience, you’ll enjoy the satisfaction of a perfectly crafted brown gravy—every single time.