How to Screenshot in Windows HP Laptop: A Step‑by‑Step Guide
If you own an HP laptop running Windows, taking a screenshot is quick and easy—once you know the right shortcuts. Whether you’re working on a school project, creating a tutorial, or just need to capture an error message, this guide covers every built‑in method and a few handy tips. In this article you’ll learn several ways to take a screen capture, troubleshoot common pop‑ups, and even turn on keyboard lights for better visibility.
1. The Classic Print Screen (PrtSc) Key
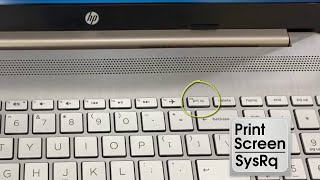
The Print Screen key, often labelled PrtSc, is the most straightforward way to grab the entire screen.
- Locate the PrtSc key on your HP keyboard. It’s usually found in the top‑right corner, sometimes combined with the Fn key.
- Press PrtSc. The current screen is copied to the clipboard.
- Open Paint, Word, or any image editor.
- Press Ctrl + V to paste the screenshot, then save it (File → Save As) in your preferred format.
For a faster workflow, press Windows + PrtSc. Windows automatically saves the full‑screen image to Pictures → Screenshots and copies a thumbnail to the clipboard.
2. Capture a Portion of the Screen with Snip & Sketch
Windows 10 and 11 include the Snip & Sketch tool, which lets you select a custom area.
- Press Windows + Shift + S. The screen dims and a small toolbar appears.
- Choose a shape: rectangular, free‑form, window, or full‑screen.
- Drag to select the region you want. The snip is copied to the clipboard and appears as a notification.
- Click the notification to open Snip & Sketch, where you can annotate, crop, or save the image.
3. Using the Snipping Tool (Legacy)
If you prefer the older interface, the Snipping Tool is still available.