Label The Water Cycle: A Step‑by‑Step Guide
Understanding the water cycle is essential for anyone studying earth science, ecology, or simply curious about how water moves around our planet. When you label the water cycle on a diagram, you not only reinforce key concepts but also create a useful reference for future learning. This article walks you through the basics of the hydrologic cycle, shows how to draw a clear diagram, and provides tips for labeling each component accurately.
What Is the Water Cycle?
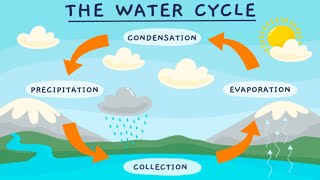
The water cycle—also known as the hydrologic cycle—describes the continuous movement of water between the atmosphere, land, and oceans. The main processes include:
- Evaporation: Water transforms from liquid to vapor and rises into the atmosphere.
- Transpiration: Plants release water vapor through their leaves, adding to atmospheric moisture.
- Condensation: Water vapor cools and forms clouds.
- Precipitation: Water returns to Earth as rain, snow, sleet, or hail.
- Infiltration: Some precipitation seeps into the ground, becoming groundwater.
- Runoff: Excess water flows over the surface into streams, rivers, and eventually the oceans.
These processes operate in a loop, ensuring that water is constantly recycled. By labeling each stage on a diagram, you can visualize how they connect and why each step matters.
Why Labeling Matters
Labeling a water‑cycle diagram helps you:
- Memorize the order of processes.
- Identify where specific terms—such as “evaporation” or “runoff”—appear in real‑world contexts.
- Develop a visual reference that supports classroom discussions, homework, and exam preparation.
Many teachers and students use animated videos to reinforce these ideas. For example, a popular YouTube channel offers an animation that walks viewers through each step while encouraging them to draw and label their own diagram. The video’s description invites viewers to ask questions in the comments, creating an interactive learning environment.
How to Draw a Clear Water‑Cycle Diagram
Creating a simple yet accurate illustration is easier than you might think. Follow these steps to produce a diagram you can label with confidence:
- Gather Materials: Use a sheet of paper, a pencil, colored markers (blue for water, green for vegetation, gray for clouds), and a ruler for straight lines.
- Sketch the Main Features:
- Draw a large rectangle to represent the Earth’s surface.
- Place a blue oval at the bottom to symbolize the ocean.
- Add a green area for land, and a few trees to indicate vegetation.
- Draw fluffy clouds in the upper half of the page.
- Show Movement:
- Use arrows to indicate upward movement